The best time to plant Zoysia plugs is after any threat of frost has passed—typically the same time you’d plant a vegetable garden. Waiting for frost-free weather gives your plugs the best chance at growing the way they should.
Installing Zoysia plugs is always best if you can do it right when you receive them, but if you have to wait they’ll be fine in their trays as long as you keep them watered and away from direct sun, which will dry them out quickly. Partial sunlight is best; if this isn't possible be prepared to water your plugs much more often to keep the soil moist.
An advantage to using plugs grown in trays is that there is much less transplant shock because the root system remains intact to a large extent. This allows the plug to start growing and spreading faster as it doesn't require the time to recover from transplant shock.
How to Plant
Prep Work
STEP 1: If you’re plugging into an existing lawn, mow it as low as possible and remove the clippings. This will discourage the existing grass from competing with the Zoysia plugs for sunlight during the first two weeks when they’re getting established. (If you’re plugging into bare dirt, skip this step!)
STEP 2: Water the area you’re going to plant in. Hard, dry soil is tough to plant in and tough for plugs to grow in. Help them (and you) out by giving the ground a good drink before you get started.
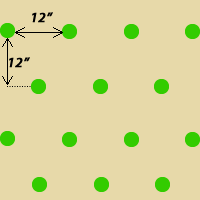
STEP 3: Determine your planting density. The closer you space your Zoysia plugs, the quicker they’ll get established and spread. If properly cared for (see Zoysia Maintenance Tips for more on this), your plugs will spread about 1-2 inches per month in each direction during the growing season. We recommend planting them 6-12 inches on center, as shown on the diagram to the right. It also helps if you offset each row—in other words, stagger the plugs. This will help them fill in faster.
Installation
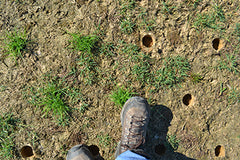
STEP 1: Using one of our Plugging Tools or a small shovel, make holes to the depth of about 1.5 inches.
STEP 2: Once the holes are created remove the plugs from tray and place a plug into each hole.
STEP 3: Go back and firmly step on each plug. This will flatten the square plug into the round hole and provide good soil-to-soil contact for the roots to begin growing. If you made the holes too large, just fill them back in with the soil you removed.
STEP 4: Water, water, water! Your newly planted Zoysia plugs must have water right away and will need to be watered every day after planting for 2 to 3 weeks. This is essential for good plant growth and to keep the roots from drying out..
Hold off on mowing the area where you've planted your Zoysia plugs for at least 2 weeks. After this, mow the lawn at about 2 inches. This will encourage lateral growth and discourage weeds.
Congratulations! Enjoying watching your new lawn grow to be the envy of the neighborhood!
 STEP 1: If you’re plugging into an existing lawn, mow it as low as possible and remove the clippings. This will discourage the existing grass from competing with the Zoysia plugs for sunlight during the first two weeks when they’re getting established. (If you’re plugging into bare dirt, skip this step!)
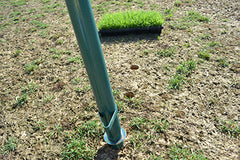
 STEP 3: Go back and firmly step on each plug. This will flatten the square plug into the round hole and provide good soil-to-soil contact for the roots to begin growing. If you made the holes too large, just fill them back in with the soil you removed.